2.1.1. Mater/Target folder (SMB)
2.1.2.Master/Target folder(Internal Storage)
2.1.3.Master/Target folder(SDCARD)
2.1.4.Master/Target folder(USB Media)
2.1.6.Master/Target folder(ZIP)
2.2.3.File last modified date filter
2.3.Directory selection filter
5.Starting from other applications
5.1.Starting from other applications
5.2.Notification of synchronization start and end
5.3.Sample code for start SMBSync2 by Application
1.Function
SMBSync 2 is a tool for synchronizing files via wireless LAN using SMB1, SMB2 or SMB3 protocol between the internal storage of Android terminal, SDCARD and PC/NAS. Synchronization is a one-way from the master to the target, mirror, move, copy, archive can be used. (Internal storage, SDCARD, SMB, ZIP combination is possible)
You can start the synchronization by external application (Tasker, AutoMagic etc) or SMBSync2 schedule. Please refer to the Starting from other applications for interface with an external application.
![]() Mirror
Mirror
If master and target files are different, to copied files from master to the target directory. To delete target files and directories if does not exist in the master.
![]() Move
Move
If master and target files are different, to copied files from master to the target directory. To delete the master directories and files copied to the target.
However, the master and target same name, same file modification time and file size, to delete the file on the master without copying files.
![]() Copy
Copy
If master and target files are different, to copied files from master to the target directory. However, the same file modification time and file size with the same name does not copy the master and target.
![]() Archive
Archive
Move photos and videos in the directory on the master side to the target under conditions such as shooting date/time than the date and time of archive execution, such as 7 days or earlier or 30 days or earlier. (However, ZIP can not be used for target)
If the determination is satisfied and the differential file one of the following three conditions.
![]() File does not exist
File does not exist
![]() Different file sizes
Different file sizes
![]() Different over when last updated 3 seconds
Different over when last updated 3 seconds
About the last update time of the synchronized file
![]() Internal storage
Internal storage
It is the same as the source file. For some models, the time will be sync.
![]() SMB sharing
SMB sharing
It is the same as the source file. However, some NAS will be sync time.
![]() SDCARD
SDCARD
On Android 7.0 and higher it is the same as the source file. However, some models are sync time.
![]() USB media
USB media
On Android 7.0 and higher it is the same as the source file. However, some models are sync time.
If you want to sync on a schedule sync or background in Android 6.0 or higher, please disable the optimization of the battery. (Menu -> Disable battery optimization)
If the response is not returned from the application when displaying the message tab at the time of sync execution, please try setting -> others -> Enable ”Text processing of sync messages”.
2.Sync settings
2.1. Sync Task
Click on the additional synchronization task in the Tasks tab.
![]() Help button
Help button
When you tap to display the help for each item. Please press the Back button to exit the help.
![]() Test mode
Test mode
It does not perform overwrite and delete the file if you check. Please be tested when you create a synchronization task, files that are copied or deleted can be found in the message tab.
![]() Auto sync task
Auto sync task
If checked the task to the automatic. Tasks that are set to automatic synchronization will start when you press the sync button.
![]() Task name
Task name
Specify task name.
![]() Sync type
Sync type
The sync method is selected from mirror, copy, move, archive. Sync is done from master to target in one direction.
![]() Mirror
Mirror
![]() Move
Move
![]() Copy
Copy
![]() Archive
Archive
![]() Swap the master and target
Swap the master and target
Swap the master and target
![]() Master folder
Master folder
Edit master folder
![]() Target folder
Target folder
Edit target folder
![]() Select files for sync
Select files for sync
If you do not check and then sync all of the file. If you check to see details.
![]() File name filter
File name filter
- Sync audio files
If you check to synchronize the files of the following extensions.
aac, aif, aifc, aiff, kar, flac, m3u, m4a, mid, midi, mp2, mp3, mpga, ogg, ra, ram, wav
- Sync image files
If you check to synchronize the files of the following extensions.
bmp, cgm, djv, djvu, gif, ico, ief, jpe, jpeg, jpg, pbm, pgm, png, tif, tiff
- Sync video files
If you check to synchronize the files of the following extensions.
avi, m4u, mov, mp4, movie, mpe, mpeg, mpg, mxu, qt, wmv
- File filter
You can select the name and extension of the file you want to synchronize with other than the above.
![]() File size filter
File size filter
You can select a file depending on the size of the file.
![]() File last modified date filter
File last modified date filter
You can select a file by its last modified date.
![]() Select sub directories for sync
Select sub directories for sync
If you do not check and then sync all of the sub directory. If you check to show directory filter button.
![]() Directory filter
Directory filter
You can select the name of the directory you want to synchronize.
![]() Sync is started only when charging
Sync is started only when charging
If checked, you can start sync only while charging. If sync is started when not charging it will result in an error.
![]() Sync files that’s exist directory under the directory specified
by the master
Sync files that’s exist directory under the directory specified
by the master
It processes the files and directories that exist in the directory specified by the master profile when you check. (The checkbox is checked the default)
It handles only the presence directory to the directory specified in the master profile if you have not checked.
![]() Confirm before override copy or delete
Confirm before override copy or delete
It will display a confirmation dialog when you want to overwrite and delete the file if you have checked.
![]() Network
Network
![]() Run even when off
Run even when off
Sync will start even if wireless LAN is off.
![]() Conn to any AP
Conn to any AP
Sync can start if the wireless LAN is connected to the any access point.
![]() Has private address
Has private address
![]() IP Address list
IP Address list
![]() Skip task if WLAN IP does not
match the specified IP address.
Skip task if WLAN IP does not
match the specified IP address.
If it is not connected to a specific access point, start the next sync task without error
![]() Allow sync with all IP addresses
Allow sync with all IP addresses
Enable sync with global IP addresses.
![]() Sync a subdirectory
Sync a subdirectory
Sync the subdirectory if you check.
![]() Sync a empty directory
Sync a empty directory
Sync the empty directory if you check.(Create a empty directory on the target)
![]() Sync a hidden directory
Sync a hidden directory
Sync the hidden directory if you check.( The name of the hidden directory starts from "." In Android, since it is represented by a bit in the directory and not the name of the directory on Samba and Windows, the directory that was created will not be in a hidden directory)
![]() Sync a hidden file
Sync a hidden file
Sync the hidden file if you check.( The name of the hidden file begins with "." In Android, since it is represented by a bit in the directory and not the name of the file with Samba and Windows, the file that is created will not be hidden files)
![]() To overwrite the file
To overwrite the file
Overwrite the file if same file exists.
![]() Wireless LAN
Wireless LAN
"Sync at the time of AP connection" sync and are not connected to the access point will exit with an error. "Access Point List" can initiate synchronization when connected to a particular access point. Please enter the access point name by pressing the wireless LAN access point list button.
![]() To retry if a network error occurs during sync
To retry if a network error occurs during sync
Retry the sync only error on the remote side. Retry is done up to three times, is carried out after 30 seconds from the error occurred retry each.
![]() If it is not connected to the specified access point, skip the
task and start the next task.
If it is not connected to the specified access point, skip the
task and start the next task.
If it is not connected to a specific access point, start the next synchronization task without error
![]() Use expanded directory selection / exclusion filter
Use expanded directory selection / exclusion filter
If checked, if the superior directory is excluded and if the sub-directory is selected, the sub-directories are subject to synchronization.
![]() When it is a mirror, delete first
When it is a mirror, delete first
![]() To not set the last update time of the target file the same as
the master
To not set the last update time of the target file the same as
the master
This option is not normally used
If checked, the last update time of the file copied from the master will be the time the file was copied. The difference judgment is judged by the existence of the existence of the file and the file size.
![]() Obtain the last modified date and time of the local file as
SMBSync2
Obtain the last modified date and time of the local file as
SMBSync2
This option is not normally used
To maintain last modified time of local file by the proprietary SMBSync(Do not use Java File#setLastModified()).
![]() To limit the IO buffer at the time of remote file writing to 16KB
To limit the IO buffer at the time of remote file writing to 16KB
Please try when the "Access is denied" error when writing to the PC/NAS folder has occurred.
If you check to limit the IO buffer at the time of remote file writing to 16KB.
![]() To use the file size to the difference judgment
To use the file size to the difference judgment
If you check it is determined as the difference file if the file size is different.
![]() To use the last update time of the file to the difference
judgment
To use the last update time of the file to the difference
judgment
If you check it is determined if the last update time of the file is different as the difference file.
![]() Last time of tolerance(Sec)
Last time of tolerance(Sec)
It allows if it is within the specified time.
![]() Never overwrite target file if it is newer than the master file
Never overwrite target file if it is newer than the master file
If checked, the file will be overwritten only when the master file is newer than the target file even if the file size and the last update time are different.
![]() Skipping processing of directories or files that contain
characters that can not be used as directory names or file names. (", :,
\, *, <, >, |)
Skipping processing of directories or files that contain
characters that can not be used as directory names or file names. (", :,
\, *, <, >, |)
If checked, it will display a warning message without processing directories/files containing unusable characters and process the following directories/files.
![]() Ignore files with a file size of 0 Bytes
Ignore files with a file size of 0 Bytes
If checked, files with a file size of 0 bytes will be ignored.
![]() Ignore the file if the length of the file name is longer than the
specified value
Ignore the file if the length of the file name is longer than the
specified value
Specifies the maximum length (in bytes) of the output file name. Ignores the file if the number of bytes in the file name exceeds the maximum.
2.1.1. Mater/Target folder (SMB)
![]() Search SMB server
Search SMB server
To scan the network for find the remote server
![]() Server name/Address
Server name/Address
To specify remote server name or IP address
![]() SMB protocol
SMB protocol
You can specify SMB protocol.
-Uses SMB V1
-Uses SMB V2(2.01)
-Uses SMB V2(2.11)
-Uses SMB V2/3(2.12)(Support SMB V2 or V3 protocol)
-Uses SMB V2/3(2.14)(Support SMB V2 or V3 protocol)
![]() Use port number
Use port number
Specify if the port number of the standard is not available. The standard port number is 139/tcp and 445/tcp.
![]() Use remote host userid and password
Use remote host userid and password
It specifies whether to use the user ID / password.
![]() User name
User name
To specify userid for host. (You cannot use a Microsoft account. Please create a local account)
![]() Password
Password
To specify password for local account.
![]() Show list(Share)
Show list(Share)
Show share name for host.
(Selectable share name will be displayed when you press the listing button, click the share name, and then press the OK)
![]() Show list (Directory)
Show list (Directory)
Show directory list for SMB host.
(Selectable directory will be displayed when you press the listing button, click the directory, and then press the OK)
![]() Directory
Directory
To specify directory for SMB host.
Target directory can be used keywords %YEAR%, %MONTH%, %DAY% and %DAY-OF-YEAR%. Keywords are replaced by the year, month and date at the start of sync.
![]() %YEAR% the year (such as 2018 or 2019)
%YEAR% the year (such as 2018 or 2019)
![]() %MONTH% month (01 to 12)
%MONTH% month (01 to 12)
![]() %DAY% day (01 to 31)
%DAY% day (01 to 31)
![]() %DAY-OF-YEAR% days since the beginning of the year (001 to 365,
leap year 366)
%DAY-OF-YEAR% days since the beginning of the year (001 to 365,
leap year 366)
Example: (Example of February 9, 2018)
![]() BACKUP-%YEAR%_%MONTH% -> BACKUP-2018_02
BACKUP-%YEAR%_%MONTH% -> BACKUP-2018_02
![]() BACKUP-%YEAR%_%DAY-OF-YEAR% -> BACKUP-2018_009
BACKUP-%YEAR%_%DAY-OF-YEAR% -> BACKUP-2018_009
2.1.2.Master/Target folder(Internal Storage)
![]() Mount point
Mount point
When the folder type is internal storage, you can select the mount point that can be used. (USB connection such as /storage/usbdisk will be displayed if available)
![]() List Directory
List Directory
Show directory list for internal storage or SDCARD.
(Selectable directory will be displayed when you press the listing button, click the directory, and then press the OK)
![]() Directory
Directory
To specify directory for internal storage or SDCARD.
Target directory can be used keywords %YEAR%, %MONTH%, %DAY% and %DAY-OF-YEAR%. Keywords are replaced by the year, month and date at the start of sync.
![]() %YEAR% the year (such as 2018 or 2019)
%YEAR% the year (such as 2018 or 2019)
![]() %MONTH% month (01 to 12)
%MONTH% month (01 to 12)
![]() %DAY% day (01 to 31)
%DAY% day (01 to 31)
![]() %DAY-OF-YEAR% days since the beginning of the year (001 to 365,
leap year 366)
%DAY-OF-YEAR% days since the beginning of the year (001 to 365,
leap year 366)
Example: (Example of February 9, 2018)
![]() BACKUP-%YEAR%_%MONTH% -> BACKUP-2018_02
BACKUP-%YEAR%_%MONTH% -> BACKUP-2018_02
![]() BACKUP-%YEAR%_%DAY-OF-YEAR% -> BACKUP-2018_009
BACKUP-%YEAR%_%DAY-OF-YEAR% -> BACKUP-2018_009
2.1.3.Master/Target folder(SDCARD)
![]() List Directory
List Directory
Show directory list for internal storage or SDCARD.
(Selectable directory will be displayed when you press the listing button, click the directory, and then press the OK)
![]() Directory
Directory
To specify directory for internal storage or SDCARD.
Target directory can be used keywords %YEAR%, %MONTH%, %DAY% and %DAY-OF-YEAR%. Keywords are replaced by the year, month and date at the start of sync.
![]() %YEAR% the year (such as 2018 or 2019)
%YEAR% the year (such as 2018 or 2019)
![]() %MONTH% month (01 to 12)
%MONTH% month (01 to 12)
![]() %DAY% day (01 to 31)
%DAY% day (01 to 31)
![]() %DAY-OF-YEAR% days since the beginning of the year (001 to 365,
leap year 366)
%DAY-OF-YEAR% days since the beginning of the year (001 to 365,
leap year 366)
Example: (Example of February 9, 2018)
![]() BACKUP-%YEAR%_%MONTH% -> BACKUP-2018_02
BACKUP-%YEAR%_%MONTH% -> BACKUP-2018_02
![]() BACKUP-%YEAR%_%DAY-OF-YEAR% -> BACKUP-2018_009
BACKUP-%YEAR%_%DAY-OF-YEAR% -> BACKUP-2018_009
![]() Allow write to SDCARD
Allow write to SDCARD
Select the SDCARD root directory to get access to SDCARD. If you can not select it please send the system information to the developer with "Menu -> System Information".
2.1.4.Master/Target folder(USB Media)
![]() Internal storage
Internal storage
Access to the mounted USB storage to internal storage and file system.
![]() SMB share
SMB share
Using the SMB protocol to share files between a PC or NAS.
![]() SDCARD
SDCARD
To access the mounted SDCARD
![]() Show list (Directory)
Show list (Directory)
Show directory list for internal storage or SDCARD.
(Selectable directory will be displayed when you press the listing button, click the directory, and then press the OK)
![]() Directory
Directory
To specify directory for internal storage or SDCARD.
Target directory can be used keywords %YEAR%, %MONTH%, %DAY% and %DAY-OF-YEAR%. Keywords are replaced by the year, month and date at the start of sync.
![]() %YEAR% the year (such as 2018 or 2019)
%YEAR% the year (such as 2018 or 2019)
![]() %MONTH% month (01 to 12)
%MONTH% month (01 to 12)
![]() %DAY% day (01 to 31)
%DAY% day (01 to 31)
![]() %DAY-OF-YEAR% days since the beginning of the year (001 to 365,
leap year 366)
%DAY-OF-YEAR% days since the beginning of the year (001 to 365,
leap year 366)
Example: (Example of February 9, 2018)
![]() BACKUP-%YEAR%_%MONTH% -> BACKUP-2018_02
BACKUP-%YEAR%_%MONTH% -> BACKUP-2018_02
![]() BACKUP-%YEAR%_%DAY-OF-YEAR% -> BACKUP-2018_009
BACKUP-%YEAR%_%DAY-OF-YEAR% -> BACKUP-2018_009
![]() Allow write to USB Media
Allow write to USB Media
Select the USB Media root directory to get access to USB Media. If you can not select it please send the system information to the developer with "Menu -> System Information".
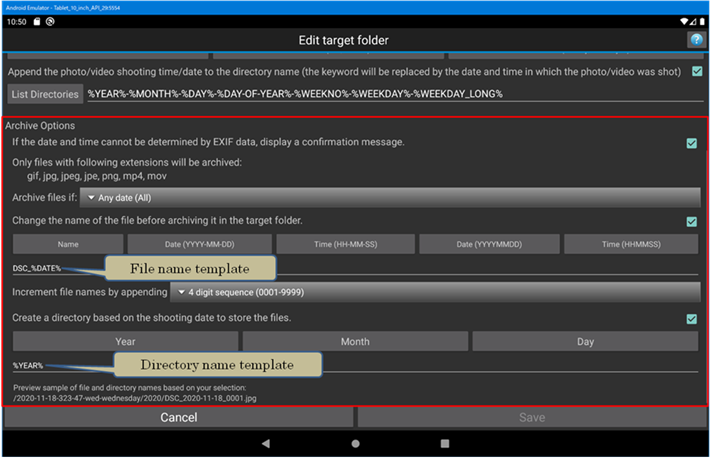
![]() If the date and time cannot be determined by EXIF data, display a
confirmation message.
If the date and time cannot be determined by EXIF data, display a
confirmation message.
If checked, when the shooting date and time can not be acquired from Exif, a confirmation message is displayed to the user as to whether or not to use the last update time of the file. If you select Cancel as a confirmation message, the file will not be archived.
![]() Archive file if :
Archive file if :
Select files with shooting date and time older than archive execution date / time. (Regardless of the shooting date and time, the shooting date is older than 7 days, the shooting date is older than 30 days, the shooting date is more than 60 days old, the shooting date is more than 90 days old, the shooting date is more than 180 days old, the shooting date is older than 180 days, It is older than 1 year. You can choose from the above items)
![]() Change the name of the file before archiving it in the target
folder.
Change the name of the file before archiving it in the target
folder.
Change it when archiving file name. The file name can be set with a template.
![]() Template for rename file name
Template for rename file name
You can create a file name pattern like DSC_%DATE%_%TIME% and change the file name when archiving. You can add keywords behind the cursor by tapping the button.
![]() Increment file names by appeding
Increment file names by appeding
You can add a sequence number to the file name.
![]() Create a directory based on the shooting date to store the files.
Create a directory based on the shooting date to store the files.
Create patterns such as%
YEAR% and DIR-% YEAR% and save them in the directory at archive time. Replace
the date and time with the shooting date and time.
2.1.6.Master/Target folder(ZIP)
![]() Save ZIP file to SDCARD
Save ZIP file to SDCARD
If cheked, save ZIP file to SDCARD.
![]() Allow write to SDCARD
Allow write to SDCARD
Select the SDCARD root directory to get access to SDCARD. If you can not select it please send the system information to the developer with "Menu -> System Information".
![]() List Files
List Files
Show file lists.
![]() ZIP file name
ZIP file name
Specify ZIP file name.
Target file name can be used keywords %YEAR%, %MONTH%, %DAY% and %DAY-OF-YEAR%. Keywords are replaced by the year, month and date at the start of sync.
![]() %YEAR% the year (such as 2018 or 2019)
%YEAR% the year (such as 2018 or 2019)
![]() %MONTH% month (01 to 12)
%MONTH% month (01 to 12)
![]() %DAY% day (01 to 31)
%DAY% day (01 to 31)
![]() %DAY-OF-YEAR% days since the beginning of the year (001 to 365,
leap year 366)
%DAY-OF-YEAR% days since the beginning of the year (001 to 365,
leap year 366)
Example: (Example of February 9, 2018)
![]() BACKUP-%YEAR%_%MONTH% -> BACKUP-2018_02
BACKUP-%YEAR%_%MONTH% -> BACKUP-2018_02
![]() BACKUP-%YEAR%_%DAY-OF-YEAR% -> BACKUP-2018_009
BACKUP-%YEAR%_%DAY-OF-YEAR% -> BACKUP-2018_009
![]() Compression level
Compression level
Select compression level.
![]() Fastest
Fastest
![]() Fast
Fast
![]() Normal
Normal
![]() Maximum
Maximum
![]() Ultra
Ultra
![]() Encryption method
Encryption method
![]() None
None
![]() ZipCrypto
ZipCrypto
![]() AES128 Bit
AES128 Bit
![]() AES256 Bit
AES256 Bit
![]() Password
Password
Specify password for encryption.
![]() Confirm
Confirm
Re-enter password for confirmation.
2.2.File filter
2.2.1.File name filter
File selection filter is used to select the files you want to synchronize.
You can choose the selection and exclusion. If you enter both the selection and exclusion is a priority excluded.
If you enter two or more filters to select the file under the conditions OR.
![]() Delete
Delete
To delete the file filter
![]() Include/Exclude
Include/Exclude
Specifies the exclusion filters or filter selection.
![]() Add
Add
Added as a filter content input to the filter box.
![]() Filter
Filter
Please input such as DSC *.JPG. Please do not enter the directory selection filters with regular expressions.
2.2.2.File size filter
You can choose which files to sync depending on their size.
![]() Less than/Greater than
Less than/Greater than
You can specify any file size.
2.2.3.File last modified date filter
You can select files whose last modification date is before or within xx days of the sync start date.
![]() If you specify 0 days before, the last update date will be
selected only for the start date of synchronization.
If you specify 0 days before, the last update date will be
selected only for the start date of synchronization.
![]() If you specify 1 day before selects files whose last modification
date is between the start date and the day before the start date.
If you specify 1 day before selects files whose last modification
date is between the start date and the day before the start date.
![]() If you specify Older than 1 day selects files whose last
modification date is before the day before the start of synchronization.
If you specify Older than 1 day selects files whose last
modification date is before the day before the start of synchronization.
Example of specifying file filter
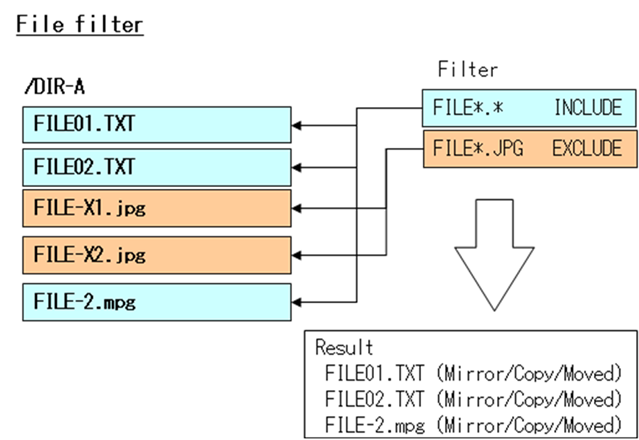
Specify following two filters.
1. “FILE*.*” as inclusion
2. “FILE*.JPG” as exclusion
File to be processed will be FIIL-2.mpg FIILE01.TXT, and FIILE02.TXT.
2.3.Directory selection filter
Directory selection filter is used to select the directories you want to synchronize.(You can choose the selection and exclusion. Exclusion takes precedence If you enter both the selection and exclusion filters.)
If you enter two or more filters to select the file under the conditions OR.
![]() Delete
Delete
To delete the directory filter
![]() Include/Exclude
Include/Exclude
Specifies the exclusion filters or filter selection.
![]() Directory listing
Directory listing
Show the directory list.
![]() Add
Add
Added as a filter content input to the filter box.
![]() Filter
Filter
A filter value. Please input such as DIR* or DIR-A. Please do not enter the file selection filters with regular expressions.
List of directory
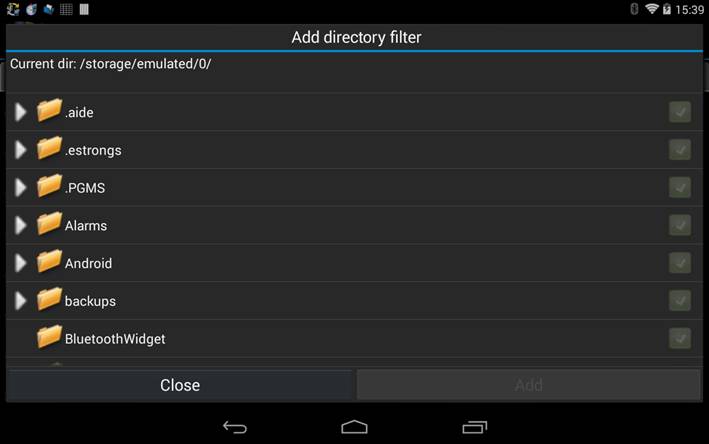
Add a filter by checking the check box on the right, and press the Add button.
Example of specifying directory filter(#1)
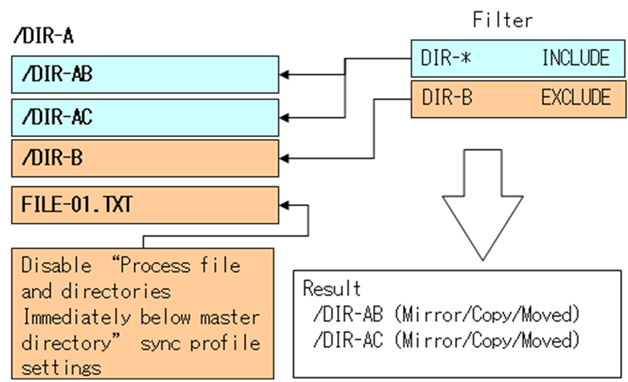
The above is a representation of how files and directories are included to /DIR-A is specified DIR filter in the case of unchecked “Handling files and directories master directory” is to be selected.
The results are processed DIR-AB, only DIR-AC is selected.
Example of specifying directory filter(#2)
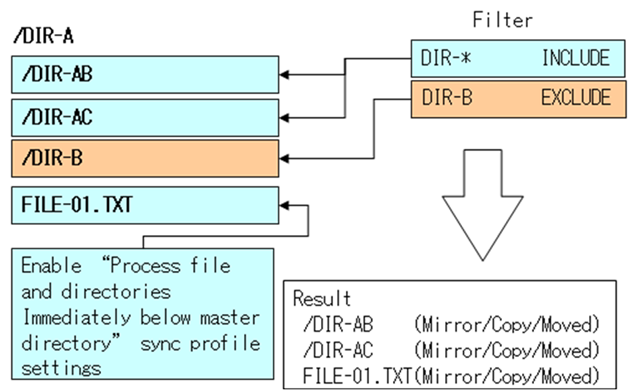
The above is a representation of how the directories and files that are included to /DIR-A is specified DIR filter in the case of Checked “Handling files and directories master directory” is to be selected.
The results are processed only file FILE-01.TXT DIR-AB, and DIR-AC is selected.
Example of specifying directory filter(#3)
It is an example when "Use expanded directory selection / exclusion filter" is checked.
DIR-AB is excluded, but DIR-AB-B is subject to synchronization because the lower directory DIR-AB-B is selected.

3.Tab Description
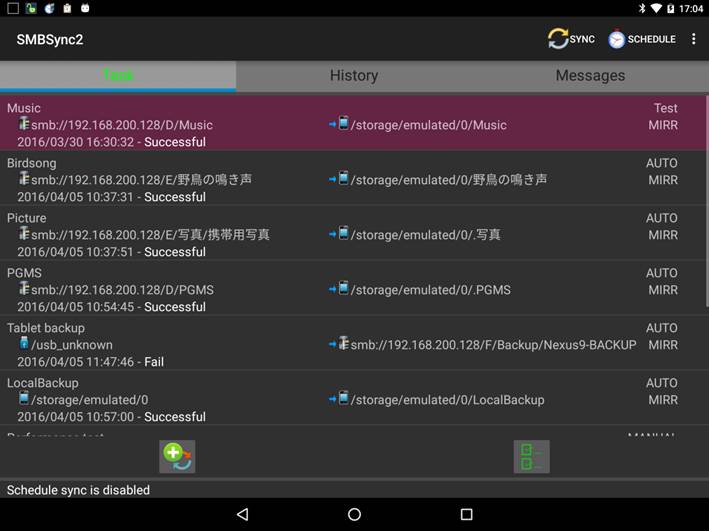
3.1.Task tab
This is a list of the task. You can do perform sync, edit , delete, add a task.
3.1.1.Basic mode
You can edit the task and tap the name of the task. It also can be operated by pressing the button at the bottom.
![]() Sync all
auto sync task
Sync all
auto sync task
![]() Add sync
task
Add sync
task
![]() Select all task
Select all task
3.1.2.Selection mode
All or selected icon and the screen switches to the selection mode by long click the profile name. Press the return key to the basic display mode.
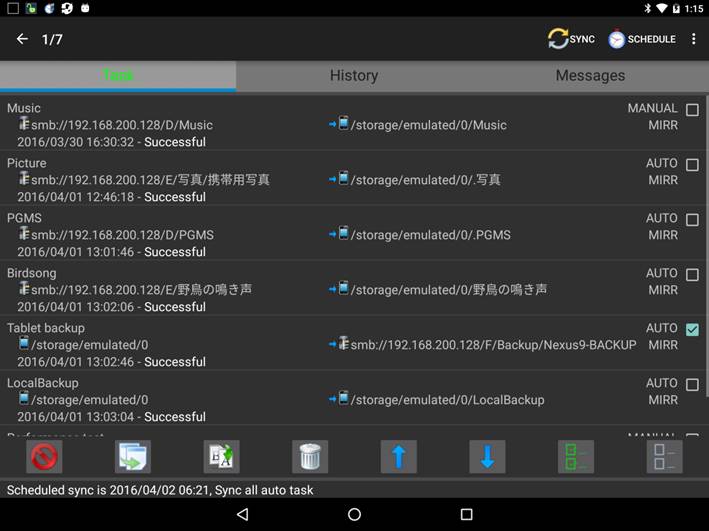
You can switch the selection and non-selection when you tap the check box on the right. You can also switch If the user taps the profile name.
![]() To
active selected profile
To
active selected profile
![]() To
inactive selected profile
To
inactive selected profile
![]() To copy
selected profile(Disabled when multiple selected)
To copy
selected profile(Disabled when multiple selected)
![]() To
rename selected profile(Disabled when multiple selected)
To
rename selected profile(Disabled when multiple selected)
![]() To delete selected profile
To delete selected profile
![]() Move to down
Move to down
![]() Move
to up
Move
to up
![]() Select
all profiles
Select
all profiles
![]() Unselect all items
Unselect all items
3.2.Schedule tab
Schedule the synchronization.
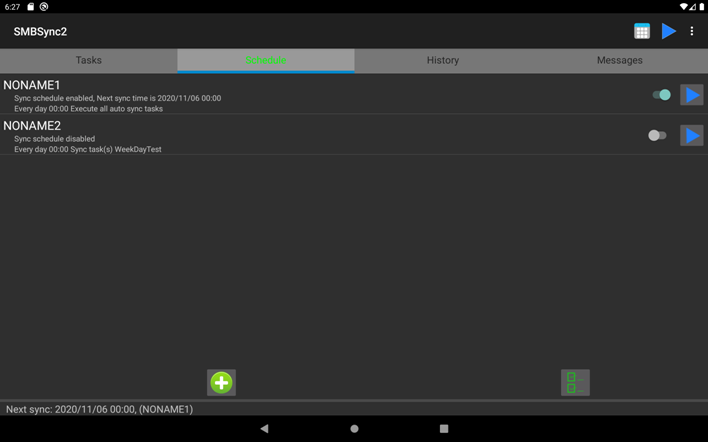
You can register multiple schedules. When you tap an individual schedule, you can edit the contents of the schedule.
You can also tap and hold/select all to go to selection mode. To exit selection mode, tap the back key.
![]() Add
schedule
Add
schedule
![]() To enable selected schedule
To enable selected schedule
![]() To
disable selected schedule
To
disable selected schedule
![]() Copy
the selected schedule (disabled for multiple selections)
Copy
the selected schedule (disabled for multiple selections)
![]() Rename
the selected schedule (disabled for multiple selections)
Rename
the selected schedule (disabled for multiple selections)
![]() Remove selected schdule
Remove selected schdule
![]() Execute
the schedule immediately.
Execute
the schedule immediately.
![]() Select all schedule
Select all schedule
![]() Unselect all schedule
Unselect all schedule
3.2.1.Editing the Schedule
When you tap the schedule name or detail part, you will move to the edit screen.
![]() Enable schedule
Enable schedule
Enable/disable the schedule
![]() Schedule type
Schedule type
The schedule can be specified as follows
![]() Every hour
Every hour
![]() Every day
Every day
![]() Every month
Every month
![]() Day of week
Day of week
![]() Interval
Interval
![]() Reset interval startup time to last sync time
Reset interval startup time to last sync time
The time of the interval schedule is recalculated from the time you press the Save button in the "Edit schedule list".
![]() First sync will start within the next time
First sync will start within the next time
The first time on the interval schedule is the minute that the second is moved forward from the current time (if the time you clicked on the "Edit Schedule" button is 12:10:20, then it is 12:11:00). (If the time you clicked the "Save" button in "Edit Schedule List" is 12:10:20, then the time is 12:11:00.
![]() Execute all auto sync tasks
Execute all auto sync tasks
Unchecked allows you to select a synchronization task
![]() Sync list...
Sync list...
Press the button to display the edit screen.
![]() Sync only starts whlle charging
Sync only starts whlle charging
You can change the options for the synchronization task.
![]() If Wi-Fi off, enable it to start the scheduled task(Not available
on Android 10 or later.)
If Wi-Fi off, enable it to start the scheduled task(Not available
on Android 10 or later.)
If Wi-Fi is off when you start syncing, turn on Wi-Fi.
![]() After Wi-Fi is turned on, delay sync by:
After Wi-Fi is turned on, delay sync by:
Waiting time to start syncing after turning on Wi-Fi
![]() Turn off back the WiFi once the scheduled tasks are completed
Turn off back the WiFi once the scheduled tasks are completed
If Wi-Fi is on at the end of the synchronization, turn off Wi-Fi
3.2.2.Sync task list
Select the synchronization task to be performed.
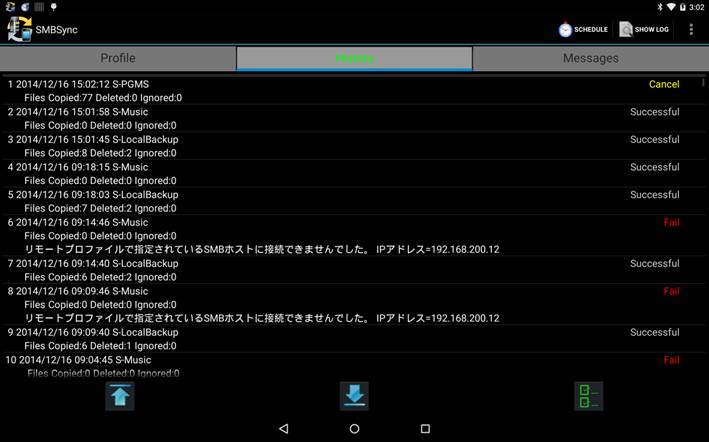
3.3.History tab
Show sync result history.
3.3.1.Basic mode
Log is displayed when the log file is saved when you tap the history if logging is enabled.
![]() Move to
top
Move to
top
![]() Move to
bottom
Move to
bottom
![]() Select
all items
Select
all items
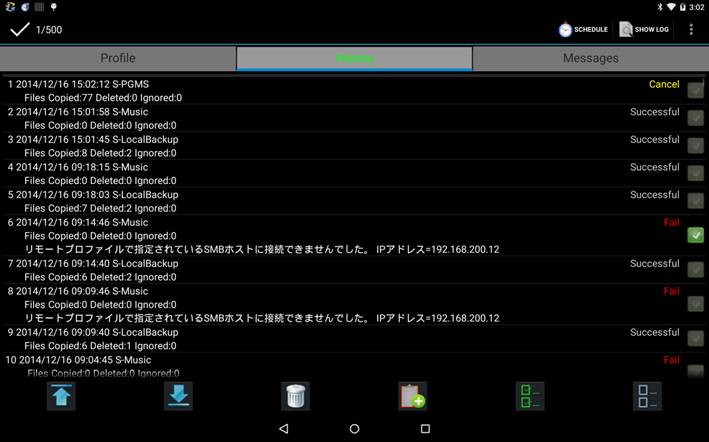
3.3.2.Selection mode
All or selected icon and the screen switches to the selection mode by pressing and holding the history. Press the key to return to the basic display mode.
![]() Move
to top
Move
to top
![]() Move
to bottom
Move
to bottom
![]() Delete
selected history
Delete
selected history
![]() Copy
selected history to clipboard
Copy
selected history to clipboard
![]() Select
all items
Select
all items
![]() Unselect
all items
Unselect
all items
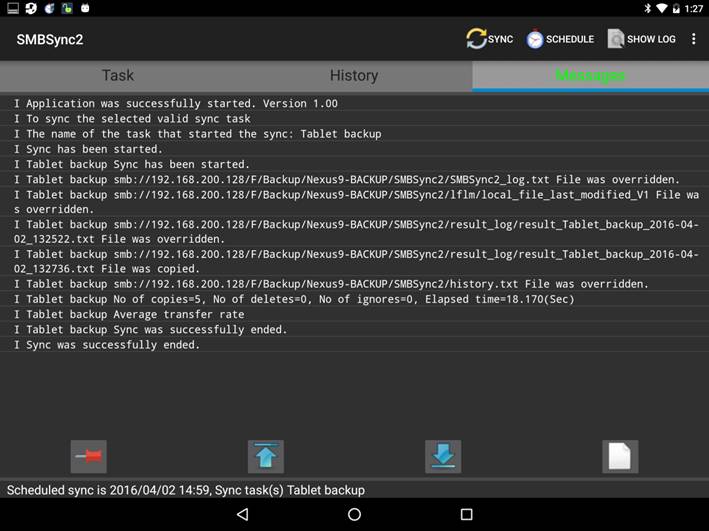
Display synchronization results and error message.
![]() Disable
auto scroll(Tap to enable auto scroll)
Disable
auto scroll(Tap to enable auto scroll)
![]() Enable
auto scroll(Tap to disable auto scaroll)
Enable
auto scroll(Tap to disable auto scaroll)
![]() Move to
to
Move to
to
![]() Move
to bottom
Move
to bottom
![]() Clear
message
Clear
message
4.Description of the Menu
To start auto sync task.
Log file display application selection screen is displayed when you select, select the application, please view.
Writes sync task to the file.
Load the sync task from the file.
Delete or send a log file..
Remove the management data of SMBSync2 that are no longer needed.
Configure the following items.
![]() Synchronization
Synchronization
![]() User interface
User interface
![]() Log
Log
![]() SMB settings
SMB settings
![]() Security
Security
![]() Miscellaneous
Miscellaneous
4.7.1.Synchronization
![]() Error process option
Error process option
Ignore errors that occur during synchronization.
![]() Wi-Fi lock
Wi-Fi lock
If checked, acquire Wi-Fi lock during synchronization.
4.7.2.User interface
![]() Application specific directory use
Application specific directory use
If enabled, Suppress “Application specific directory use” warning message.
![]() Notification
Notification
Playback default notification sound when sync ended
![]() Vibration
Vibration
Vibrate your device when sync ended
![]() Screen theme
Screen theme
Use light theme.
4.7.3.Log
![]() Message logging option
Message logging option
Decide how to save log messages to a file.
![]() No
No
![]() It with the date (log-yyyy_mm_dd.txt) in the file name, (create
the file if it does not exist)
It with the date (log-yyyy_mm_dd.txt) in the file name, (create
the file if it does not exist)
![]() Log file generation
Log file generation
![]() Log
Log
Determine the type of messages written to the log message.
![]() Log message directory
Log message directory
Determine the message log file directory. (Default is /mnt/sdcard/SMBSync)
4.7.4.SMB Settings
![]() Restore default value
Restore default value
Restore default value
![]() lmCompatibility(SMBv1)
lmCompatibility(SMBv1)
JCIFS LM Compatibility(Initial value:3)
![]() Client response timeout
Client response timeout
30000 milli sec
![]() Disable plain text passwords(SMBv1)
Disable plain text passwords(SMBv1)
Do not encrypt password(Not checked)
![]() useExtendedSecurity(SMBv1)
useExtendedSecurity(SMBv1)
Use extended security(Checkked)
4.7.5.Security
![]() Security
Security
Tap to display the detailed setting screen. If you are creating an application password, the password authentication screen will be displayed and you will not be able to proceed unless the correct password is entered.
4.7.5.1.Security settings
![]() Application Password
Application Password
![]() CREATE PASSWORD
CREATE PASSWORD
Create application password
![]() REMOVE PASSWORD
REMOVE PASSWORD
Remove application password
![]() CHANGE PASSWORD
CHANGE PASSWORD
Change application password
![]() Items to protect
Items to protect
Not enabled unless an application password is created
![]() Set the validity time of password authentication to 30 minutes
Set the validity time of password authentication to 30 minutes
If you do not check it, re-authentication will not be performed until the application is terminated. However, when displaying the security detail setting screen, always re-authenticate.
![]() Perform application password authentication when “Launch
application”
Perform application password authentication when “Launch
application”
The application can not be started until the correct password is entered. However, the sync task runs without a password.
![]() Perform application password authentication when “Edit task”
Perform application password authentication when “Edit task”
You can not edit until the correct password is entered.
![]() Perform application password authentication when “Export task
list”
Perform application password authentication when “Export task
list”
You can not “Export task list” until the correct password is entered.
![]() Hide the saved account name and password when editing the SMB folder
Hide the saved account name and password when editing the SMB folder
When checked, the saved account name and password will be blank, so please enter your account name and password again.
4.7.6.Miscellaneous
![]() Exit cleanly
Exit cleanly
Check to kill the process at the end of the app.
![]() Text processing of sync messages
Text processing of sync messages
Check to make the Android standard word wrap.
4.8.Kill the application
Kill the SMBSync2.
Load the profile from the file.
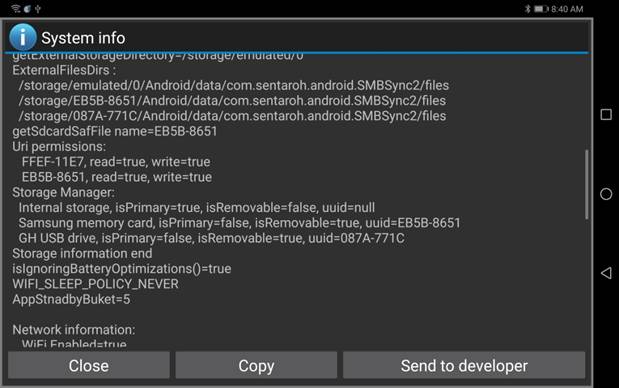
Edit the list to force USB media to be recognized as USB by specifying its UUID when it is recognized as SDCARD.
However, the USB media must be recognized as ExternalFilesDirs. (You can check this in Menu->System Info)
In the example below, the UUID is 087A-771C is the USB media.

4.11.About SMBSync2
View feature overview, privacy policy and change history.
Show system information and send to developer.
5.Starting from other applications
5.1.Starting from other applications
You can initiate synchronization by issuing an intent with “com.sentaroh.android.SMBSync2.ACTION_START_SYNC” from application to action.
Intent Extra allows you to specify the tasks to synchronize.
Synchronizes the autosync task when Extra is not specified.
Code Example 1 (start synchronous tasks test1 and test2)
Intent in=new Intent("com.sentaroh.android.SMBSync2.ACTION_START_SYNC");
String prof= "test1,test2";
in.putExtra("SyncProfile", prof);
startActivity(in);
Code Example 2 (Start all auto-sync tasks)
Intent in=new Intent("com.sentaroh.android.SMBSync2.ACTION_START_SYNC");
startActivity(in);
5.1.1.Example for Tasker
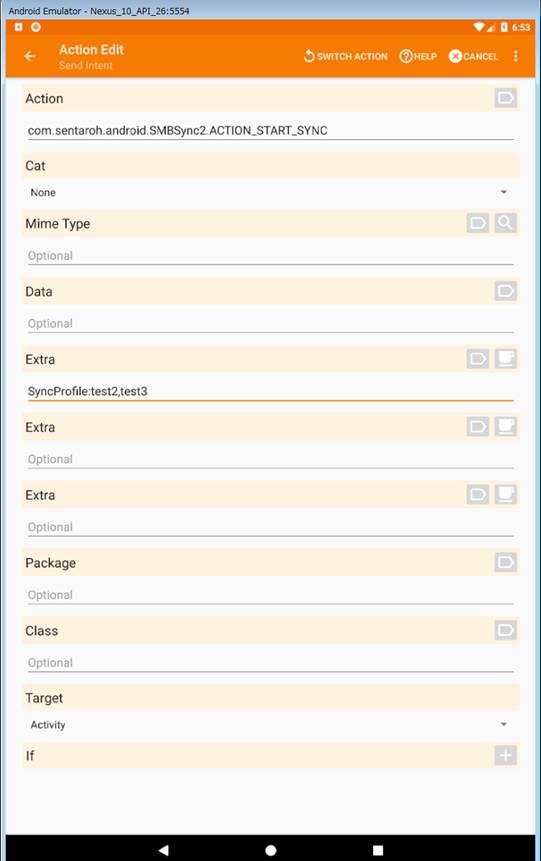
Action:com.sentaroh.android.SMBSync2.ACTION_START_STNC
Extra: SyncProfile:”prof1, prof2”
Target: Activity
Sample task is here
https://drive.google.com/file/d/1AV1pIXlaR9yXlam3TTXBR85m-g22SXSr/view?usp=sharing
5.2.Notification of synchronization start and end
![]() Issues a broadcast intent at the start and end of
synchronization.
Issues a broadcast intent at the start and end of
synchronization.
![]() Start :com.sentaroh.android.SMBSync2.ACTION_SYNC_STARTED
Start :com.sentaroh.android.SMBSync2.ACTION_SYNC_STARTED
End :com.sentaroh.android.SMBSync2.ACTION_SYNC_ENDED
![]() If you want the app to detect the timing of synchronization start
and end, please receive the intent on the broadcast receiver.
If you want the app to detect the timing of synchronization start
and end, please receive the intent on the broadcast receiver.
![]() The exit status string is stored in ExtraData of Intent. The key
is SYNC_RESULT.
The exit status string is stored in ExtraData of Intent. The key
is SYNC_RESULT.
![]() SUCCESS
SUCCESS
![]() ERROR
ERROR
![]() CANCEL
CANCEL
![]() WARNING
WARNING
![]() Sample
Sample
![]() Tasker
Tasker
https://drive.google.com/file/d/1JIRbLKX-2PyfmfePMPNinx9p3jAr2933/view?usp=sharing
![]() Automagic
Automagic
https://drive.google.com/file/d/1HfPaMg75tuJU7jkYXBi5j0gvxNTBORwG/view?usp=sharing
5.3.Sample code for start SMBSync2 by Application
The following code sample to start SMBSync2 from Activity.
public class MainActivity extends Activity {
@Override
protected void onCreate(Bundle savedInstanceState) {
super.onCreate(savedInstanceState);
setContentView(R.layout.activity_main);
Intent in=new Intent("com.sentaroh.android.SMBSync2.ACTION_START_SYNC");
String prof= "S-PGMS,S-Pictures,INTERNAL-TO-SDCARD";
in.putExtra("SyncProfile", prof);
sendBroadcast(in,null);//Android 5/6/7
}
OR
public class MainActivity extends Activity {
@Override
protected void onCreate(Bundle savedInstanceState) {
super.onCreate(savedInstanceState);
setContentView(R.layout.activity_main);
Intent in=new Intent("com.sentaroh.android.SMBSync2.ACTION_START_SYNC");
String prof= "S-PGMS,S-Pictures,INTERNAL-TO-SDCARD";
in.putExtra("SyncProfile", prof);
startActivity(in);//Android 5/6/7/8
}
7.Acknowledgments
Thank you for translating it into English for volunteers.